
‘What does this button do Mummy?’
Joe’s twitchy finger flies towards the On/Off switch on my laptop.
‘Noooooooo! We don’t touch that one sweetheart.’
The kids are fascinated by how I spend my time when I’m holed-up in the office working. They will regularly use all their guile to convince Daddy they are playing peacefully, and then sneak out of the house and run down to my writing cave to say ‘Hi’, brimming and grinning with their own cleverness. Unless I have an imminent deadline I don’t mind these brief interruptions – in fact, I love that my freelance life creates this possibility.
But.
I do wish my laptop was equipped with a protective force-field button. They gravitate towards it like orbital bodies on a collision course with planet Mum. Of course they do. It has winking blue lights. It beeps. And Peppa Pig lives inside the U-shaped-Tube hidden beneath the shiny back-lit keys. It bestows the gift of black-and-white colouring sheets to the printer on demand, and magically creates playlists on the ipod of all those chirpy songs from Disney movies. What’s not to like?
I can imagine that in their eyes the laptop receives an irritating chunk of my daily attention quota and has, therefore, assumed a somewhat mythical quality – ‘If Mummy devotes so much time to this piece of electronic wizardry it must be pretty special, right? And I’m a kid, so if it’s special – I WANT ONE!!!’
Hmm. I feel a make coming on. Surely a laptop can’t be that hard to create? And if it distracts jam-covered digits from my working lifeline for at least five minutes then it has to be worth the effort …
It was. Here’s how it played out:
What you will need:
- Cardboard or thick card
- Scissors
- Paint
- Plastic document sleeve
- Sticky tape
- Glue stick
- Blue tac
- Circular stickers
- Colouring pens
- Thin black or blue marker pen
- Velcro
How to make it:
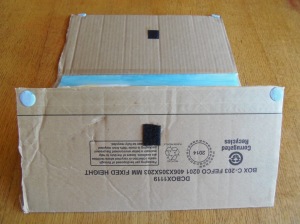
- Find or cut out a piece of cardboard or thick card that is just a little more than A4 length (30-31cm), and about 2.5 times A4 width (51-52cm). Lay it flat
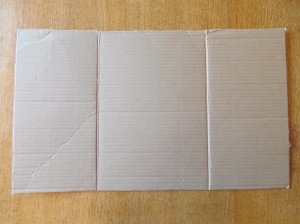
- Mark a line at 15cm in from each end and create an inwards fold along each line – this will create a centre section that is just slightly larger than A4 in all dimensions
- If you have the time (and patience!) you can paint whatever colours you like, on both sides. My mini-Mummys were too excited to wait, so we skipped this step. Brown is the new black in corporate-kid world
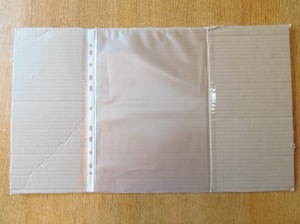
- Take a plastic document sleeve (like the ones you clip into ring-binders) and place it squarely in the middle of the centre section. Use sticky-tape to secure it down its long sides. The strip with holes in can pass onto one of the folded sections and be secured there. This is you laptop ‘screen’
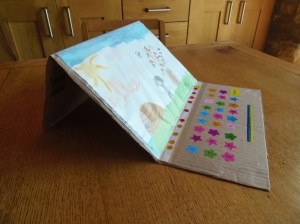
- Turn the card so that the narrow end is towards you and the length stretches away from you on the table. The strip of hole in the document sleeve should be on the section closest to you. Take some Blue tac and place a small blob under the bottom two corners of the card. Press them down onto the table in front of you to keep it still
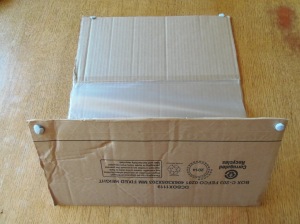
- Reach for the top fold of the card, and lift and bend the top fold upwards and towards you, creating a triangle that acts as a stand for your ‘laptop’. Use two more blobs of Blue tac under on the top edge of the card to keep the stand upright
- Take some stickers and make a line of 11 small-ish shapes along the row of holes in your document sleeve. Use the marker pen to write the numbers 0-9 on the stickers. On the last one draw the On/Off symbol (incomplete circle with a small line cutting into it vertically from the top)
- Using other stickers if you have them, or colouring pens, create a ‘Keyboard’ of letters and other symbols on the flat section of your laptop. For small kids the Alphabet in the right order and a Space Bar is probably sufficient
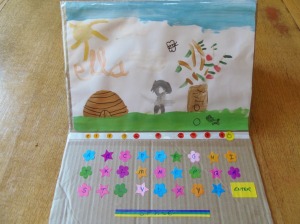
- Ask you child to choose a few favourite pictures and insert them into the document sleeve. Place their favourite on top. This their ‘Screen’, and show them how rotate the pictures to keep it interesting. They can add new ones as they create them
- There is one final flourish to add. Unpick the Blue tac but leave it attached to the card. Fold the smaller sections in over the ‘Screen’ – the bottom section first, then the top one. Make a mark in the middle of the overlap on both folding sections. Take a small square of velcro and glue the fluffy section the bottom, and the scratchy section to the top. Now your kid’s laptop is portable
- Et Voila! A laptop – just like Mummy and Daddy’s


My two kids (6 and 3) loved this – I suspect any children much older than 8, or any that already have a wealth of electronic gadgets of their own may not be so easily fobbed off with something that doesn’t actually switch on, but you never know! It may not be a force-field, but it could just provide enough distraction to prevent your own kit being destroyed by inquisitive little fingers. It kept mine busy for about 30 mins (Ella) and 5 mins (Joe). Less time than it took to make. Naturally. But that’s not the point is it? Spending time away from the real thing and actually doing something with the kids is what it’s all about 🙂
